Upgrading Coriolis
This guide describes the procedure for performing an in-place upgrade of Coriolis service containers using the console upgrade option introduced in Coriolis v2603.0.
The upgrade is performed directly from the Coriolis Console and updates the running Coriolis service containers to the specified version.
Starting from Coriolis v2608.0 , a new option was added, Patch Coriolis Component , to upgrade just a single component of Coriolis.
1. Prerequisites and Preparation
Before initiating the upgrade, verify the following requirements.
Confirm the upgrade path with the Coriolis Support Team
Check for the supported versions and for any major changes.
Perform the upgrade during a planned maintenance window.
Create a full backup or snapshot of the Coriolis virtual appliance.
Verify Available Disk Space
Ensure the appliance has sufficient free disk space; the recommended usage threshold should be <80%.
Schedule a Maintenance Window
The upgrade process temporarily stops Coriolis services, and migration/DR jobs will not run during the upgrade process.
The Coriolis appliance must have internet access to download the container images, either directly or through an HTTP/HTTPS proxy.
The following URLs need to be whitelisted in order to perform an upgrade:
https://registry.cloudbase.it
https://bitbucket.org
https://github.com
https://raw.githubusercontent.com
https://pypi.python.org
https://pypi.org/simple
https://registry-1.docker.io
https://docker.io
2. Verify Current Coriolis Version
Before starting the upgrade, determine the currently installed Coriolis version.
Step 1 - Access the Coriolis Console
From the Coriolis virtual appliance console, access the CLI.
Step 2 - Check the Installed Version
Run the following command and save the version number.
cat /etc/coriolis/coriolis.release

Now you can return to the main console menu with the options.
When exiting the CLI, select Not to restart the Coriolis containers.
3. Coriolis Upgrade and Patching Procedures
Coriolis can be updated using two different approaches, depending on the type and scope of the required change: a full Coriolis upgrade or a targeted component patch.
A full Coriolis upgrade updates the Coriolis platform to a newer release, including the relevant Coriolis service containers and components. This approach is typically used when upgrading to a newer supported version that includes multiple fixes, improvements, or new functionality.
A Coriolis component patch is intended for scenarios where the Coriolis Team provides a targeted patch or backport for a specific Coriolis component, allowing a fix to be applied to the currently deployed release without requiring a full Coriolis platform upgrade.
Unlike a standard Coriolis upgrade, which updates the Coriolis service containers to a newer platform version, a component patch affects only the component(s) explicitly identified by the Coriolis Team. This minimizes the scope of the change and can reduce the operational impact when a full platform upgrade is not required or cannot be performed immediately.
The following sections describe the two procedures:
3.1. Upgrade Coriolis
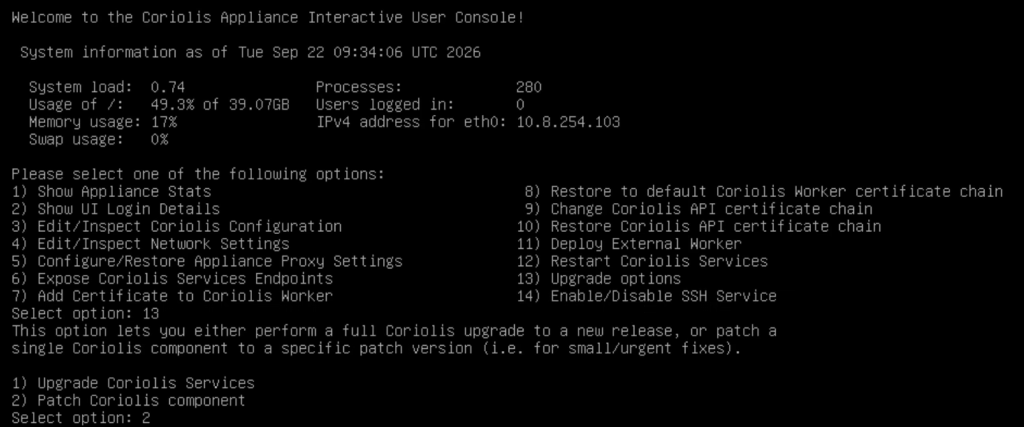
Step 1 - From the Coriolis Console menu, choose:
13) Upgrade Options
Step 2 - Choose the option:
1) Upgrade Coriolis Services
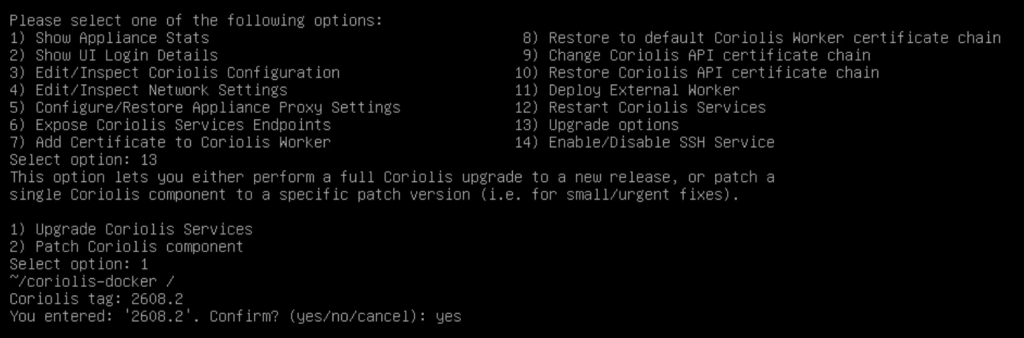
Step 3 - Specify Target Version
You will be prompted to enter the Coriolis version to upgrade to, for example:
2608.2
Important:
The target version must be newer than the currently installed version
Downgrades are not supported
Upgrading versionsolder than 2603.0 to this release is only available through Coriolis Support.
Step 4 - Confirm Upgrade
Confirm the selected version when prompted. After that is provided, the upgrade process begins.
3.2. Patch Coriolis Component
Starting from Coriolis v2608.0 , a new option was added, Patch Coriolis Component , to upgrade just a single component of Coriolis.
NOTE: This procedure is intended for scenarios where the Coriolis Team provides a targeted patch or backport for a specific Coriolis component, allowing a fix to be applied to the currently deployed release without requiring a full Coriolis platform upgrade.
Step 1 - From the Coriolis Console menu, choose:
13) Upgrade Options
Step 2 - Choose the option:
2) Patch Coriolis Component
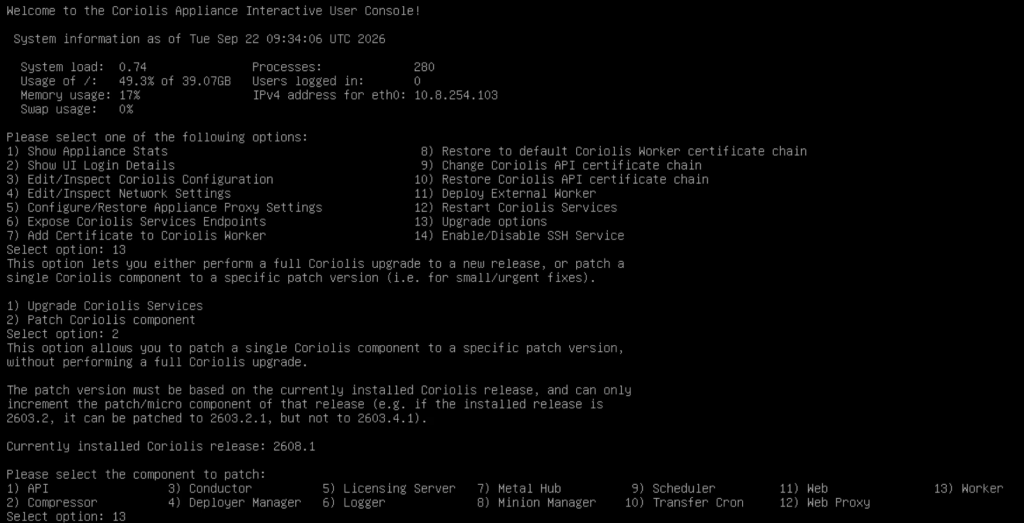
Step 3 - Specify the Coriolis Component to be upgraded
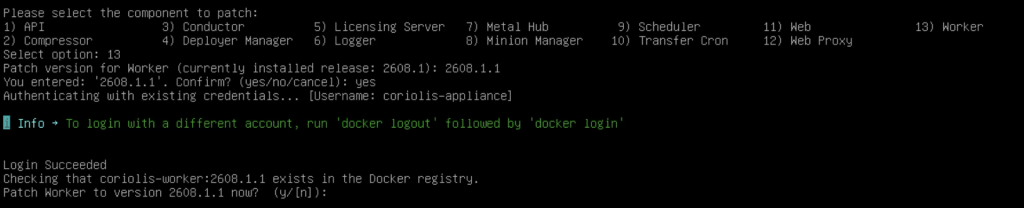
In this interactive menu you can select one of the 13 components of Coriolis that can be upgraded independently.
In the below example, the Worker component was selected.
Step 4 - Specify the version to be upgraded to
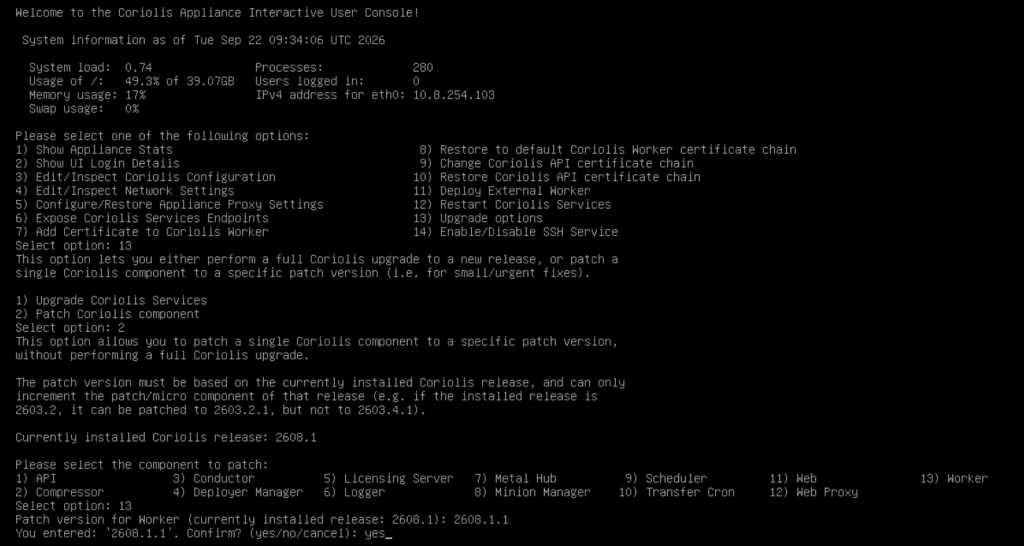
You will be prompted to enter the Patch version for Component to be upgrade to, for example:
2608.1.1
Important:
The target patch version must be newer than the currently installed version
Downgrades are not supported
Components can only be incremented to a patch of the current release (from 2608.1, they can be upgraded to 2608.1.1, but not to 2608.2.1)
Next, you will need to confirm the selection
Step 5 - Coriolis checks if the selected version exists
Coriolis verifies that the selected version exists in the Docker registry and then prompts to start the upgrade process
Step 6 - Post-Patch Verification
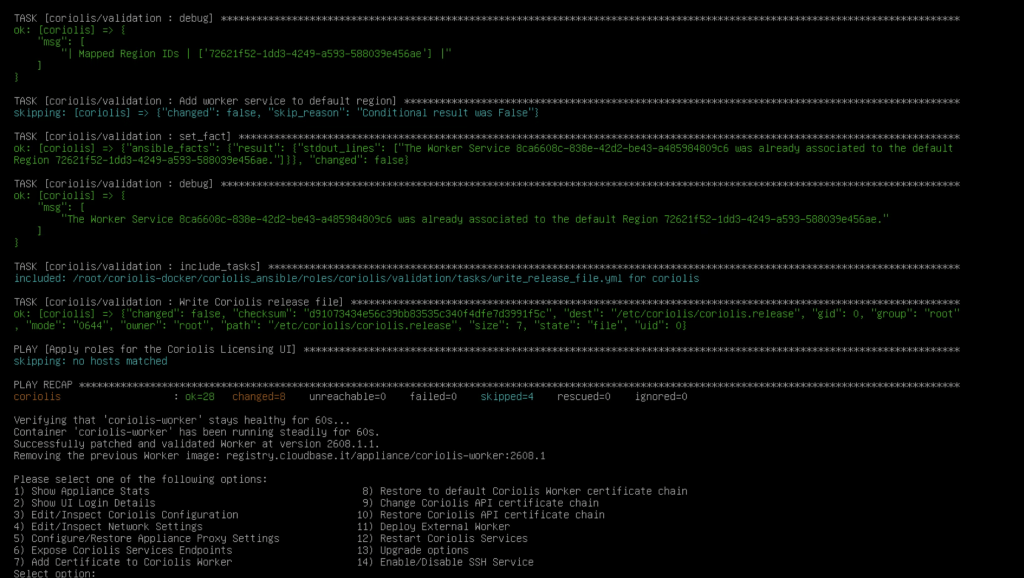
Once the component is patched to the new version, Coriolis waits 60s and checks if the upgrade was successful.
NOTE: In the case the upgrade was not successful, Coriolis reverts the component to the version prior of the patch.
4. Upgrade Process
During the upgrade, the appliance will download the new container images and update all the Coriolis service containers. This operation may take several minutes to complete.
Do not interrupt the upgrade process or press any keys while it is running, as this may corrupt the appliance. The console should be kept open and monitored for any events or messages showing the progress.
5. Upgrade Completion
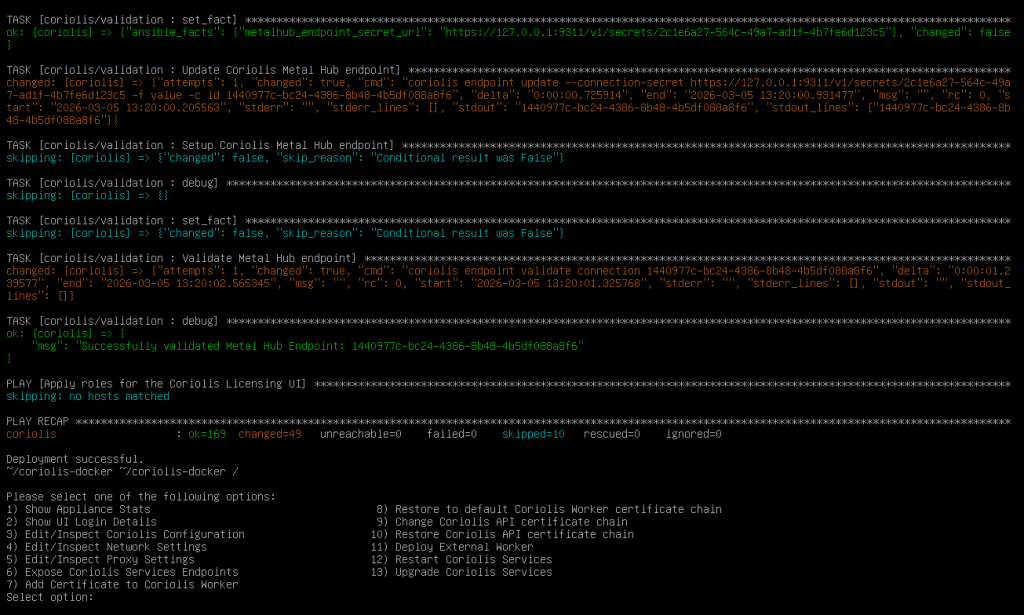
Once the upgrade process completes successfully, you will see the following screen. Indicating that the Ansible playbook finished and control has returned to the Coriolis Console. This indicates the upgrade process has completed successfully and the Coriolis services are running with the new version.
NOTE: In case the upgrade was not successful, Coriolis reverts the components to the previous version.
After each upgrade, the Coriolis configuration file ( coriolis.conf) is replaced with a default version that does not contain any modifications previously made to the file.
Before the upgrade process begins, Coriolis automatically creates a backup of the existing configuration. The backup file keeps the same name and includes a timestamp indicating when the backup was created.
To restore the previous configuration, select option 3) Edit/Inspect Coriolis Configuration from the Coriolis Console to enter the CLI.
Before restoring the backup configuration file, you may want to review the differences between the current configuration and the backup, as there may be new options for the corresponding plugins of the platform clouds used.
You may do this by running:
diff -u /etc/coriolis/coriolis.conf /etc/coriolis/coriolis.conf.<timestamp>
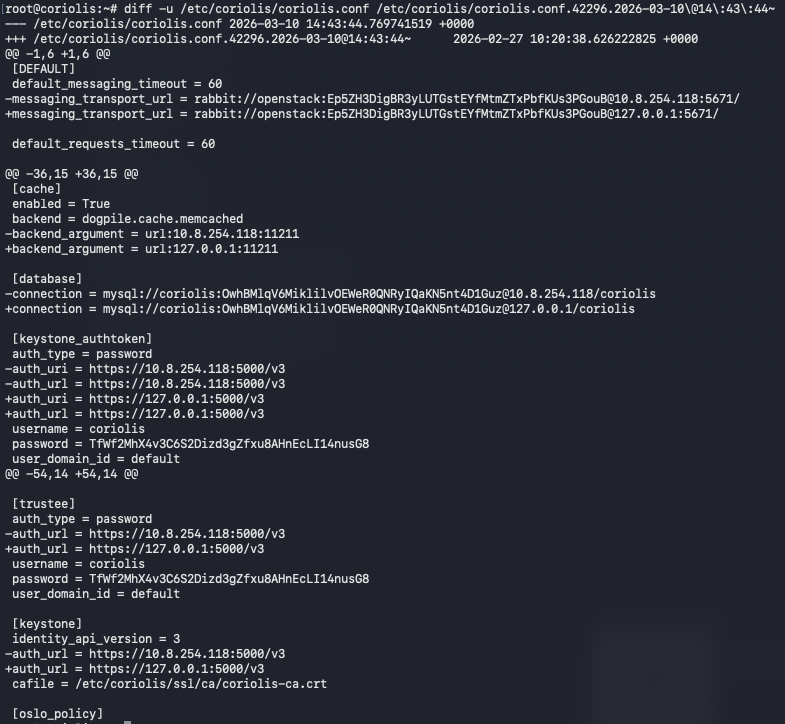
After reviewing the changes, run the following command to overwrite the default coriolis.conf file with the backup version.
cp /etc/coriolis/coriolis.conf.<timestamp> /etc/coriolis/coriolis.conf
Replace
After restoring the file, exit the CLI and select y (Yes) when prompted to restart the Coriolis containers.
6. Post-Upgrade Verification
After the upgrade, it is recommended to check the following:
Verify the installed version as outlined in step 2 above, and confirm that it matches the target upgrade version.
Log in to the Coriolis web UI interface and browse through the options.
When using DR, monitor the scheduled jobs to successfully resume and run as set.
For Migrations, observe for any new settings and verify that new executions are running without errors.